Jin_Mataaka
Eternal Poster
- Joined
- Feb 17, 2016
- Posts
- 831
- Reaction
- 1,215
- Points
- 349
Hello guys!
Today I will show you how to create an ovpn config. The most basic and easy way.
Requirements:
Open VPN App (Download at playstore)
Text Editor (Any, Download at playstore)
Talas ng isip
Mahabang pasensya
Notes:
Host used in this example is google based
Sim Used: TM (without promo and load)
APN: Default
Alam ko at alam niyo din na madami ng tutorial dito about how's, siguro my idea na kayo of what is open vpn and where can you download a ready made config files from any server and what/how to use text editor in your devices Let's get started.
First:
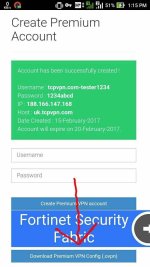
Create an account from any website hosting a VPN server.
Ex. You do not have permission to view the full content of this post. Log in or register now.
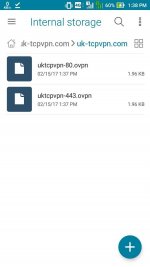
After creating an account download its .ovpn config file.
Screenshot:
Look for a Host URL (known as bug sites)
Ex. m.google.com
You can also look for a unique host using a Reverse IP Look Up Tools
Ex. You do not have permission to view the full content of this post. Log in or register now.
*Why it is called a bug site.
-Because the VPN app will be injecting some codes to its HTTP header to create a bug, so we can access them freely through a VPN server.
*Not all website can be a bug site, due to their built-in security.
Third:
Look for a working proxy.
Where can I find it?
Search it on google.
Ex. You do not have permission to view the full content of this post. Log in or register now.
*Always check your proxy status for a better connection.
How?
Search for a "proxy checker" on google.
Ex. You do not have permission to view the full content of this post. Log in or register now.
Fourth:
Since we already have all the necessary things we need:
VPN Account
ovpn config file
Host
Remote Proxy
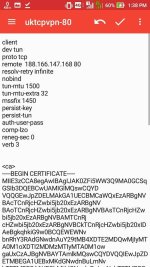
We will now edit the ovpn config file that we downloaded from our VPN hosting website to add our Host and Remote Proxy.
Screenshot:
*I used Port: 80 config in this example. You can use the port: 443 or any other ports if 80 won't work.
What do we do now?
We will be adding Our host and Remote Proxy to the config.
How?
We will insert this keywords to our config using a text editor.
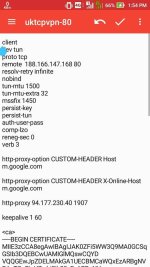
So, let's now add this keywords in the config.
Screenshot:
Okay, so the keywords have been added and we are ready to save it as .ovpn file.
Wait! Why is it that I did not include "http-proxy-option CUSTOM-HEADER X-Forward-Host (Host)"?
-Because I don't want to request anything more from the host. As I've said its optional.
Fifth:
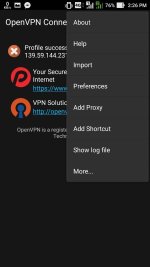
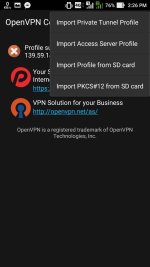
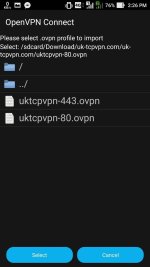
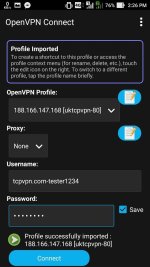
Import the profile config to Open VPN App then Connect
Screenshot:
Discussion:
Kung nagtataka kayo, bakit ang kaunti lang ng keywords na ginamit ko.
Kasi yan lang ang mga values na kailangan pero hindi included sa default na config.
Sa mga natirang values like DNS, timeouts, authentications at iba pa ay hindi kailangan ispecify kung wala ka namang gagawing espesyal na request. Automatic ma se-set to default yung mga values na hindi naka indicate sa config.
Kung gusto mo naman i-set lahat ng values manually at i-challenge ang sarili mo.
Check this website:
You do not have permission to view the full content of this post. Log in or register now.
or
You do not have permission to view the full content of this post. Log in or register now.
Makikita niyo jan ang mga keywords at mga functions nila. You're free to use them as much as you want. Always do your own research and do the trial and error.
FAQ:
Q: Paano po kung sa ibang website ako gumawa ng account at ng nag-download ng config?
A: Okay lang po iyon. Basta huwag na huwag mong galawin o palitan ang mga values sa default config na nadownload mo. Ang importante ay maidagdag mo ang kailangan nating keywords.
Q: Saang part ko po dapat idagdag or ilagay ang keywords na kailngan natin?
A: Kahit saan po, sa taas, sa baba o sa gitna.
Disclaimer:
This tutorial does not guarantee you a free working internet. This only serves as a guide for you to explore on how to make it free.
-Kung meron man akong nasaulat na mali, please correct me.
-Kung meron mang nakasulat na my katulad sa iba at naunang post. I give the credits to them.
If you have more questions, drop it down in the comment box. I'll try my best to answer it.
Avoiding the problem does not solve it.
Today I will show you how to create an ovpn config. The most basic and easy way.
Requirements:
Open VPN App (Download at playstore)
Text Editor (Any, Download at playstore)
Talas ng isip
Mahabang pasensya
Notes:
Host used in this example is google based
Sim Used: TM (without promo and load)
APN: Default
Alam ko at alam niyo din na madami ng tutorial dito about how's, siguro my idea na kayo of what is open vpn and where can you download a ready made config files from any server and what/how to use text editor in your devices Let's get started.
First:
Create an account from any website hosting a VPN server.
Ex. You do not have permission to view the full content of this post. Log in or register now.
After creating an account download its .ovpn config file.
Screenshot:
Second:
Look for a Host URL (known as bug sites)
Ex. m.google.com
You can also look for a unique host using a Reverse IP Look Up Tools
Ex. You do not have permission to view the full content of this post. Log in or register now.
*Why it is called a bug site.
-Because the VPN app will be injecting some codes to its HTTP header to create a bug, so we can access them freely through a VPN server.
*Not all website can be a bug site, due to their built-in security.
Third:
Look for a working proxy.
Where can I find it?
Search it on google.
Ex. You do not have permission to view the full content of this post. Log in or register now.
*Always check your proxy status for a better connection.
How?
Search for a "proxy checker" on google.
Ex. You do not have permission to view the full content of this post. Log in or register now.
Fourth:
Since we already have all the necessary things we need:
VPN Account
ovpn config file
Host
Remote Proxy
We will now edit the ovpn config file that we downloaded from our VPN hosting website to add our Host and Remote Proxy.
Screenshot:
*I used Port: 80 config in this example. You can use the port: 443 or any other ports if 80 won't work.
Above, you can see a default setup of the ovpn config file that we downloaded earlier.
What do we do now?
We will be adding Our host and Remote Proxy to the config.
How?
We will insert this keywords to our config using a text editor.
http-proxy-option CUSTOM-HEADER Host (Host)
http-proxy-option CUSTOM-HEADER X-Online-Host (Host)
http-proxy-option CUSTOM-HEADER X-Forward-Host (Host)
http-proxy (Remote Proxy Port)
keepalive 1 60
This keyword selection will perform a CONNECT method of request. I will add more keywords soon, if I find it useful for everyone.
What are this keywords?
If you are familiar with "HTTP Injector", it works the same way.
http-proxy-option CUSTOM-HEADER (Host)
-This keyword indicates our Host
http-proxy-option CUSTOM-HEADER X-Online-Host (Host)
and
http-proxy-option CUSTOM-HEADER X-Forward-Host (Host)
-This is optional if you want to add this in the config.
-This keyword indicates to request for the contents from our (Host). Contents simply means, what is in the website. This are (texts,images,cøøkíés,api's etc). This will also let the Host know what are we using (Proxy,VPN,DNS etc) to establish a connection and to send request.
http-proxy (Remote Proxy Port)
-This keyword indicates our Proxy
keepalive 1 60
-This keyword is the same with ping command. If the connection is disconnected it will perform a reconnection after 1 second. If the reconnection is taking a long time and have reached 60 seconds, the system will send another connection request.
*You can modify this numbers to anything that suits you.
So, let's now add this keywords in the config.
Screenshot:
Okay, so the keywords have been added and we are ready to save it as .ovpn file.
Wait! Why is it that I did not include "http-proxy-option CUSTOM-HEADER X-Forward-Host (Host)"?
-Because I don't want to request anything more from the host. As I've said its optional.
Fifth:
Import the profile config to Open VPN App then Connect
Screenshot:
The username and password is the one you created in the First step.
Discussion:
Kung nagtataka kayo, bakit ang kaunti lang ng keywords na ginamit ko.
Kasi yan lang ang mga values na kailangan pero hindi included sa default na config.
Sa mga natirang values like DNS, timeouts, authentications at iba pa ay hindi kailangan ispecify kung wala ka namang gagawing espesyal na request. Automatic ma se-set to default yung mga values na hindi naka indicate sa config.
Kung gusto mo naman i-set lahat ng values manually at i-challenge ang sarili mo.
Check this website:
You do not have permission to view the full content of this post. Log in or register now.
or
You do not have permission to view the full content of this post. Log in or register now.
Makikita niyo jan ang mga keywords at mga functions nila. You're free to use them as much as you want. Always do your own research and do the trial and error.
FAQ:
Q: Paano po kung sa ibang website ako gumawa ng account at ng nag-download ng config?
A: Okay lang po iyon. Basta huwag na huwag mong galawin o palitan ang mga values sa default config na nadownload mo. Ang importante ay maidagdag mo ang kailangan nating keywords.
Q: Saang part ko po dapat idagdag or ilagay ang keywords na kailngan natin?
A: Kahit saan po, sa taas, sa baba o sa gitna.
Disclaimer:
This tutorial does not guarantee you a free working internet. This only serves as a guide for you to explore on how to make it free.
-Kung meron man akong nasaulat na mali, please correct me.
-Kung meron mang nakasulat na my katulad sa iba at naunang post. I give the credits to them.
Spoiler contents are visible only to Established Members.
Thank you for reading![Tutorial]How to generate http injector payload based on host's response header.
https://phcorner.net/t/how-to-generate-http-injector-payload-based-on-hosts-response-header-payload-host-rp.261198/
If you have more questions, drop it down in the comment box. I'll try my best to answer it.
Avoiding the problem does not solve it.
Attachments
-
You do not have permission to view the full content of this post. Log in or register now.
Last edited:
